Polymer Clay Fan

Free Sculpting Tutorials

Search Results

Fiddler Sculpting Series

Posted by goregt On August - 9 - 2009

The Fiddler

sculpture of a fiddler

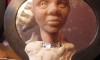
Ever hear Charlie Daniels “The Devil Went Down to Georgia” song? Well if you have a pulse and are over the age of twelve then you probably have. To make a long story short I thought I would do a sculpture based off of that song. Not that it is my favorite song in the world or that I’m Charlie Daniels number one fan (although I do think it is a pretty cool song), I just thought it would make an interesting sculpture.

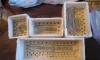
I’m going to put together a series of tutorials for this sculpture where you can see step by step how the sculpture is created. Now keep in mind that at first the sculpture is not going to look like much but over time, as the series progresses, you should be able to see how I turn a block of clay into a unique piece of art. I think this will be a fun lesson for everyone and a great way to see how a sculpture comes to life. I will add links to the different lessons below so bookmark this site and come back frequently to see the latest lessons. It takes me over 100 hours to complete a sculpture so don’t expect this thing to be completed over night ;-)

Read the rest of this entry »

Sculpting Tribal Torso

Posted by goregt On July - 13 - 2007

I’ve made enough progress on the face at this stage where I can move on to the torso.  Initially when I started this sculpture I only had plans to build a bust (sculpture from the waist up).  However, after working on it for some time I decided to do a full figure instead.  The reason why I am pointing this out is because I did not build an armature for this sculpture that would support an entire figure.  So for the next couple of lessons I will be sculpting this piece as if it were going to end up as a bust and then will switch to doing a full figure sculpture.

Ideally you will want to build out the armature for the full figure from the beginning since it will produce a better and more stable armature.  However, if you feel you need to take the design in a new direction there is no reason why you can’t.  The armature that I will use in the future post is not ideal for a full figure but it will work for this piece and will allow me to make the changes in the direction of my vision.

* This sculpture is created with Super Sculpey.

Read the rest of this entry »

Sculpting An Arm

Posted by goregt On June - 15 - 2007

Starting to sculpt the arm

OK, we have a good start on the face, made pretty good progress on the torso and sculpted the fiddle and a hand.  Now it is time to start making the Fiddler look like an actual fiddler.  I’ve been wanting to attach the fiddle to my sculpture for some time now but in order to do so I need to first build out the arm.

Now I started the beginning stages of the arm some time ago so the torso in some of the images isn’t as far along as it is in some of the more recent tutorials.  The first two images in this tutorial were taken quite awhile back while the rest of the images were taken recently.  I had plans to do the arm earlier in this series but decided it would be best to put it together after the fiddle was completed.

Read the rest of this entry »

Sculpting Lips

Posted by goregt On March - 24 - 2007

Sculpting the lips – time to fix some errors!

Well, I have some good news and I have some bad news. The bad news is that I checked the proportions of my sculpture in the mirror and a lot of the facial features were off. The eyes, nose, cheeks and mouth just need a lot of work. This is a good example of why you should consistently check your sculpture in the mirror when you are sculpting. I started out by checking the symmetry in the mirror but I failed to continue to do so in the later stages. If you have no idea what I am talking about then read the “Why use a mirror when sculpting” lesson first.

The good news for you is that I have to sculpt the eyes and mouth all over again. So, this is a good opportunity to show you the individual stages of sculpting the different facial features. I’ll break the sculpture features up into different lessons.

Read the rest of this entry »

Fiddler Completed

Posted by goregt On August - 18 - 2009

Completed Sculpture

After completing the shoulder details and baking the sculpture I was pretty much done (except for some of the details in the back and painting the sculpture which were not documented for this piece).  For those that have been following this series my apologies, two years is much too long to add the completed tutorials.  My art and sculpting style has changed a lot since then but I still wanted to go back and finish this tutorial for everyone that had been patiently following it.

Read the rest of this entry »

Mold Making – Step Two

Posted by goregt On February - 14 - 2009

The Second Step for Making a Mold

The key ingredients for making a successful mold is planning and patience. Planning is obvious but patience can easily be overlooked. It is important that you take your time and do everything step with and precision. Otherwise what is the point of spending all that time creating your sculpture if you are not going to be able to replicate it with the same type of quality and detail.

This tutorial will cover in detail on how to make a mold box. The mold box is what is going to be used to hold the silicone while it hardens. In future lessons we will go into detail on how the final mold is created.


Read the rest of this entry »

Making a Mold – Step One

Posted by goregt On December - 16 - 2008

Mold making is one of those tricky little things that can be very simple or complex depending on what it being molded. Over the next few tutorials I’ll show you how to create both a simple and a complex mold all from the same sculpture.

The sculpture that I will be using for the tutorial is complex in design with tons of detail work and will serve as a great example that no subject matter is too detailed to be molded.


Read the rest of this entry »

Spicing up the neck

Posted by goregt On July - 13 - 2007

Spicing up the neck

I’m a very dynamic sculptor (I’ve said this before and I am sure I’ll say it again). With my own original art I usually have a basic idea of the sculpture I want to create but once I get started I just kind of make things up as I move along. Personally I view this as a strength and not a weakness because the final design usually ends up better than the original vision.

That being said the new design to the horns has given me an idea on how I can spice up the rest of the sculpture a bit. I’ll start with changes to the neck in this tutorial and will move on from there in the later lessons.

* This sculpture is created with Super Sculpey.

Read the rest of this entry »

Changing the design of the horns

Posted by goregt On June - 24 - 2007

Changing the design of the horns

sculpting horns in polymer clay
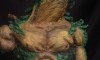
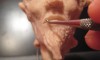
The original horns on this sculpture have been bugging me for some reason.  Although I was not finished with sculpting them, I just didn’t love the way I had designed them.  I have been wanting to change the horns around a bit but was not exactly sure what I wanted to do.

So after setting aside the original design for a few weeks I decided to tackle the horns one more time.  I like to make things up on the spot when I sculpt so the first step for me was to smooth out the original design and just start adding clay to the piece.

* This sculpture is created with Super Sculpey.

Read the rest of this entry »

Adding veins to the arm

Posted by goregt On June - 24 - 2007

Finish blocking off the arm

In the previous lesson we built a solid foundation for the left arm. We are now at the stage where it is time to start adding all the little details. The steps in this lesson will build off of the rolling snakes and sculpting veins tutorials (I recommend visiting those
lessons first). We will not finish the sculpting on the arm in this lesson but
by the end of the page the left arm should look like it is getting close to
completion.

* This sculpture is created with Super Sculpey.

Read the rest of this entry »

VIDEO

Enter the video embed code here. Remember to change the size to 320 x 270 in the embed code.

TAG CLOUD

Recommended Sites

About Me

Nothing special, just a self-taught sculptor having fun with my art and showing all of you the tips and tricks I use to create my own artwork

Twitter

    Photos

    Activate the Flickrss plugin to see the image thumbnails!